Showing posts with label simple. Show all posts

16 October, 2015

Java Programming Tutorial - Unit 2 - Methods and Variables

Let's start from where Unit 1 left off.  During the first steps, we instructed our computer to write "Hello World!" to the display.  Through that unit, we went through quite some material, despite it being so simple.  In this unit, we'll cover more practical points rather than theoretical ones, so get ready to write some more code this time!

Variables

So, what is a variable?  As the name clearly indicates, it is something that varies.  A variable is just a label which you can use to store something.  Let's say we want to store our user's name, we create a new label named username and assign the user's input to this label.  A user types in their name and we instruct the computer to store the input somewhere which can be addressed using the word "username".

To better understand and appreciate how useful that little label is, try imagining having hundreds of such variables all without a human-friendly name.  You d not need to go far, older languages had no such concept and used exclusively memory addresses.

With this knowledge, you can now think of your computer's memory as being a large room full of P.O. Boxes.  Each P.O. Box may be referred to by its number.  In modern languages you can give each P.O. Box its own unique name too, so it's easier for you to know what you're working with.

The next bit is theoretical, however its good to know about variable terminology.
Java is known as being strongly-typed.  This strongly named description simply means that each variable can have one type, and one type only.  If we declared our username variable as being of type text, it can only contain text.  If we had another one for storing a number, it can only store a number.  It's a restriction, but it's convenient.  There are language that have variables whose types change during runtime, or weakly-typed.  It's convenient too, but its easier to shoot yourself in the foot if you're new to it.

Let's make use of a variable in a more practical example.  In this task, we want our text to be defined as a variable, rather than passing a direct value to System.out.println.


As you can see, the change is minor.  In the new line, the only thing which may be new is the String label.  A String is simply a series of characters; it is a type of variable which you'll find in the vast majority of programming languages.

Variable types

Now that you have declared your first variable, and hopefully got to understand the relation between the type of the variable and the content it stores, it is safe to introduce the list of primitive types in Java.  As you now know, Java is object oriented and everything is defined as a class.  This implies that every instance in our program is an object.  However, this is not entirely true, since objects need to be made up of something.  If we keep going deeper into what constitutes and object, we find that there are only 8 primitive types.  Each primitive type is made up of some number of bits.  These are as follows; afterwards we'll go through them:

  • boolean - no specific number of bits, but practically 1
  • byte - 8 bits
  • char - 16 bits
  • short - 16 bits
  • integer - 32 bits
  • long - 64 bits
  • float - 32 bits
  • double - 64 bits
As you can see (assuming you're familiar with bits, the basic units of information), all types are practically increasing sizes of numbers.  No letters, no images, nothing but numbers.  Later I'll explain how everything can be made from these primitives, but first let's see how we can organise them into roughly three categories.

First we have the boolean type.  This can have just two values, 1 or 0.  Effectively we use true or false in Java, and is mostly used for setting states and flags.

Next come the natural numbers.  All primitives from the byte to the long can fall under this category.  Values stored by these types cannot have any values after the decimal point.  One thing to note about the char type is that it does store a numeric value, however it is treated as a character.  Note also that it is a 16-bit unicode.

Finally we have the real numbers; the float and double.  Double, as the name implies, is just double the size of a float.  It is usually much more practical to work with a double unless you're working on a high performance system where memory is precious (not all systems have gigabytes of memory to waste).

Primitive types can be easily declared or have a value assigned to them.  If you want an integer with a value of 10, simply enter:

int myNumber = 10;


Composites

Now that you have the most granular types, it is possible to mix and match to create more complex types.  A composite is basically another name for an object.  The String type, for example, is a composite.  In order to explain this composite, we need to introduce another programming term; arrays.  An array is just a contiguous series of memory cells, each containing a value of the same type.  Java has native support for arrays supports defining new arrays during runtime (older languages did not support this directly).  The next snippet shows how we can use an array of characters to emulate a String, albeit in a less practical way.


Unlike primitives, composites, or the proper name, objects, are created using the new keyword.  The declaration also follows this convention:
Type myTypeVariable = new Type();

As you can see, there is the type, the name, followed by the assignment to a new instance of the class (or type).  Note though, that the String is an exceptional case in Java and can be declared like a primitive.  This is only an exception and does not apply to any other class.

Probably the String is not enough, so let's go through some more examples.  Let's say we want to show a picture.  What constitutes a picture?  Pixels, the number of pixels in width, and in height.  Width and height are just numbers.  The pixels are an array of the Pixel object (so we also have nested composites).  And after that, what is in each pixel?  Three values for the primitive colours Red, Green and Blue;  again, three numbers.

Let's define our own Picture type.  First, we need a Pixel.  Then we'll create a Picture and we'll find its area.  Using this area, we'll set the value of the pixels in our Picture, since initially this is null.


Now we'll create the program "body".  The main class this time will create the image, the pixel array, and print out the area.  Note how we concatenated the text and a variable using the '+' symbol.  I'll explain the operators later on in this unit.


So you see, pretty much anything can be reduced to a number.

Operators

As I mentioned earlier, I'll give an introduction to operators.  These are not so complex so there is not much else to learn about them.

Operators are the symbols used in code, such as the '+', '-', etc.  The plus can be used for concatenating anything.  For example, let's say we have variables a and b.  a + b could mean the following:
If a and b are primitive, the result is a primitive.  If any of a or b is not a primitive, the result is always a String representation.

Other operators are only reserved for primitives:
  • The minus '-' used to subract;
  • The star '*' is used to multiply;
  • The slash '/' is to divide.  The value is rounded if not of types float or double;
  • The percent '%' used for obtaining the modulo;
  • The hat '^' is used for bitwise XOR;
  • The pipe '|' is used for bitwise OR;
  • The ampersand '&' is used for bitwise AND;
  • The exclamation mark '!' is used for NOT;
  • The greater than '>' and less than '<', for...well greater or less than;
  • The double greater and less than ('<<' and '>>') for bit shifting;
You shall not be using many of these in the early days.  However you should be familiar with the computing terms used here (such as shifting and bitwise operations).

Methods

We mentioned something about methods during the first unit, mostly trying to relate them to the methods in your recipe books.  This time, we shall add more methods to our little picture program.  At first it might seem like overkill to have too many methods for a simple task, but as your project grows you'll come to appreciate shorter and more frequent methods.

So, the first task - adding new methods.  But why, what are they going to do?  Imagine we want our program to accept a user input.  For this task, we'll use methods that were written by others - we'll be calling those methods.  Afterwards we'll break up our program into smaller methods so that later on we can follow better programming practice.  In this case we'll write our own methods too.

The program

Our next task will be to add on to the Hello World Picture program.  This time the area will be calculated by the picture, rather than us having to calculate it in our main program.  We'll also let the user specify the width and height of the picture.  This user input will need some processing, as we shall see next.

First, we'll extend the Picture class so that it can support its own methods.  We shall call this PictureExtended to avoid confusion for now.


Next we'll upgrade the main program.  As you can see, it has many more methods and the functionality is more granular.  If we had two pictures for example, we could still call the same createPicture, thus avoiding duplicate code.


Static vs not static

Note how we put static in front of methods in the main class, while we did not put any in the PictureExtended.  Now that we do have some methods and classes, it is safe to explain it.

Static methods are those methods that can be called without having an instance of the enclosing class.  For example, we never declare a new System or Stream class, but we call println on  System.out variable (which is of type Stream).  This is because it is declared static.  However, we cannot call getArea() on PictureExtended by itself.  We must have a new PictureExtended and place it in a variable.  We are then able to call it from the variable.

This is basically the difference between static and non-static; if it is static, it can be called without an instance of the enclosing class;  However, it cannot access the non-static members of the class.  Let's say we make the getArea() static, in that case, we cannot access the width and height values of the PictureExtended instance.

Accepting user input

We are able to accept user input via the Scanner class.  Again, this is just like System, a class already provided with Java (although we had to create a new Scanner, unlike System).  Note how we passed System.in to it, telling it that we expect to receive input from the standard system input; the keyboard.

The difference from System is that Scanner resides in what is known as a package which is different from ours.  We will go through packages in a later Unit, however note how we needed to import the class.  The import statement has to be at the very top, outside the class declaration.

Conclusion 

This was quite a long unit and covers quite a lot.  We created new classes, instances of these classes, or objects, static methods and imported some other ones too.  In the next units we shall go over further interesting bits of programming in Java, such as loops, cases and conditionals.

Other tutorials (which are just as good or better) may hold off explaining the details of classes and objects initially.  I believe that this might send off the wrong message about Java.  It is understandable that it is initially complicated, however it will embed the idea that in Java one should follow an object oriented methodology, otherwise the code will not be up to standard.  Not that it is incorrect, but as projects grow, not following conventions will make Java very frustrating.

So, as a precaution, I'm giving out fairly detailed descriptions of why classes and objects before going further into the traditional loops and conditionals.  Hopefully the descriptions coupled with the actual code will make it more natural.

Thank you!

09 October, 2015

Tutorials on Java and related subjects

Like many others in the field of IT, specifically software development, my passion for coding started way before I even considered looking for a job.  I was probably 13 or so when I wrote down my first few lines of code in Pascal and the moments of glory in class when my mates looked in awe at that spanking grey-on-black "Hello World!".

Could have launched a satellite with this!

Many things have changed since then, but coding has remained a central part of my life...mostly because it pays my bills (more than that too :) ).  One thing which got me to this point is the Internet community.  I wouldn't have been able to write the second line of code had it not been for that tutorial on some obscure website.  Of course, teachers and lecturer played a big part - they are not to be underestimated.  But once you're out the door, the tutorials on the Internet are your "only hope".  This only hope, though, is a treasure trove full of resources, from zero to hero.

So, after all these years I now feel able, and willing, to contribute back to the awesome community.  My experience is vastly Java and so I hope I shall contribute valuable information to those aspiring Java programmers.  I shall start publishing a crash course in Java, starting with the venerable "Hello World!" and ending up who knows where.  I'm aiming at enterprise Java, but we'll see.  The target audience would be hobbyist, student, and even professional developers, but having of course a basic understanding of a computer.

Thanks for coming by and I hope to welcome you again for the Java Tutorial Series!

07 October, 2015

The Volatile Security of Volatile Memory

I forgot about yesterday...
It is the black box in every system, even our brain.  Volatile memory goes by many names, working memory, temporary memory, RAM, even just memory.  Whatever your preference, when you mention it you're most likely referring to the area of a system in which data is stored for a relatively short period of time until it is used and then discarded (or transferred to persistent storage).  One cannot possibly imagine a system without some form of memory; even if it is the same are where it is stored permanently, there is still some area used for temporary calculations.

Among the major differences between RAM and persistent storage is that RAM typically contains data about the processes that are currently in execution along with the data we are working on right now and will be discarded soon (yes I hear your screams, persistent storage does that too, but it also has data that we haven't looked at for months).  Along with this fact, hard disks enjoy the possibility of being totally encrypted.  They cannot be read unless the key is provided.  This is not possible in RAM, primarily because the CPU cannot work with encrypted commands.

I do not mean that the CPU is not able to process encrypted data and convert it to plain text, what I am referring to is the inability of the CPU to understand encrypted commands (opcodes) or work on the encrypted data as data rather than a decryption payload.  Let's say we have the binary value of 13 = 1101 and we want to add that to 5=101.  Our simple XOR encrypter will give us the values 0111 and 000 for the keys 1010 and 101 respectively.  Adding 0111 and 000 does not give the actual result for 18=10010.  The values have to be in plain text before actual processing.  XOR is simple and integral to CPUs so it is the simplest operation for it to decrypt the values.  Once decrypted it is then possible to add the values.

But here is the problem - where is the key stored?  Of course, working memory.  What is the point of encrypting the data in RAM when the key is in the same RAM?  What is the point of encrypting RAM after all?

Boom!


We encrypt disks because they can be removed or because they are portable, yet still contain data, unlike RAM which hold it until we turn off the system (or a bit longer if you're into memory freezing and forensics).  So, we think, RAM is inaccessible to would-be hackers.  Or so we used to think.

Recent research by various people and organisations (Sophos, Brian Krebs, Volatility Labs, among others) have identified a simple and small malware that simply looks up processes, maps their memory regions, copy paste and onto the attackers server for them to enjoy.  And by the way, the kind of data was not you're ex's text messages, but the PIN to you credit card, so it's a bit more expensive I would say.

Use only for great dinners.

I did my own research (and eventually BSc. thesis) on this subject, and it is quite scary knowing that the very heart of your system may be so easily compromised.  What's worse is that when you enter your PIN into any other system on which you have no control...God knows what's running on them and where your data goes.  Anti viruses barely have an idea how to capture such an attack, and neither do firewalls, internet protection or whatever you have.  If they did, they would block your debugger too, because that's how it works - like a debugger.  It's like a kitchen knife used for a murder - you cannot ban knives.


Here's a short and sweet step-by-step on how you can scrape your memory.  It's not intended to attack anyone, and it wouldn't be easy any way.  It's successful only if your target cannot protect their networks and you manage to get in.  The sample was done on Linux;  Windows would be totally different but still very possible (the Target attacks were in fact on Windows).  So here it goes:

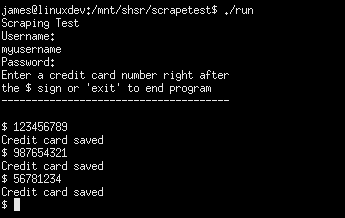
A dummy little program was written in C.  All it did was store a username and password (entered using getpass() for increased security) along with a series of credit card numbers that are "swiped" into the system.

insertion.png
Swiping cards
We then find the PID of this running process just by ps aux | grep scrape (the program is named scrape, but it may be something like POSSwiper for example)

get pid.png
Getting the PID

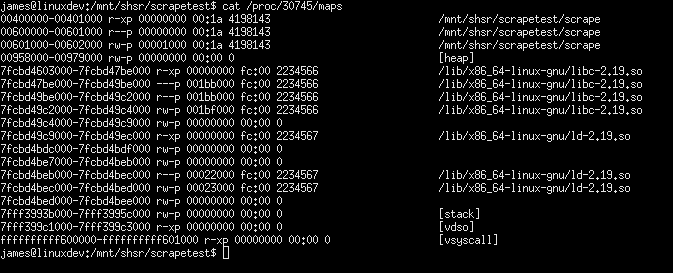
Now we can get all the memory regions and maps used by our processes.  The /proc directory gives us a hand there.

dump maps.png
/proccing to analyse the memory

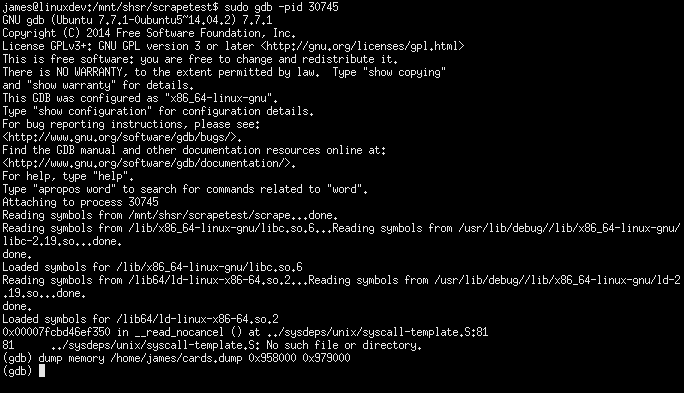
We are interested in the heap space of our program which shows up nicely in the fourth line;  ranging from address 009580000 to 00979000 (both hex).  Next thing we do is fire up the actual scraper (which is, in our case, a kitchen knife.  A legitimate gdb debugger).

gdb dump.png
Dumping memory in just one line!

GDB shows a bunch of text; we're only interested in how we started it (gdb -pid <PID>) and how we stole the memory (dump memory <to where> 0x958000 0x979000)  As you can see, using the exact heap space memory range we got from /proc.  The memory will be dumped to the file we choose.  Of course, this requires administrator rights, but as one might expect, tens and hundreds of POS devices will most likely share the same password, and will probably have the default one too (such a typical case of a security breach - I found the password to my ISP's router on a public forum...).

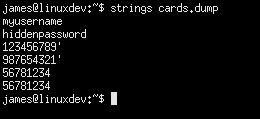
Now, onto the next step - the analysis, if you call it that.  Data dumped into the file is from RAM, so as expected it is binary.  Linux simplifies this analysis by providing another tools - strings.  All it does is see what's in a file and spit our all the strings it could find.  That's it, so we pass the dump to it and we get a nice list of string, including the password (you didn't see it in the first screenshot because of getpass()) and all the numbers and everything.

acquire strings.png
The gold mine

That is all.  Now go and whitelist the list of processes on your system, before someone gets to scrape the memory off it.

02 October, 2015

Hosting static websites on AWS S3

Hosting websites nowadays has become quite simple, easy and affordable.  Years ago you would try to find free hosts which would allow you to upload a few files and you're done.  GeoCities and freewebs were some of the most popular of these services.  As time went by, the data centre landscape has changed dramatically and the current situation is big companies offering extremely cheap hosting services.  The market is so huge that the classic "brochure site" has become almost free to host while still enjoying world class availability and scalability.

Static websites are the simplest form of site.  These are just a set of HTML pages linked together via links.  No complicated code, no weird configurations - just plain old files.  Depending on what you want, such a site may be ideal (maybe you do all your business transactions over a facebook page and use the site just as a brochure).


This of course has the advantage of being simple, easy, cheap and can be up and running very quickly, including development time.  It lacks, however, some of the major features you may want, such as a member's area, blogs and news, user-generated content etc.  But then again, you might not want these extra features.  In that case, here is a simple, short and sweet guide on how to host your site on Amazon Web Services.  There is no doubt that it is currently the leader in cloud services and it would be wise to use their services.

1. Get A Domain

The first thing you need is the dot-com.  You may use or favourite registrar or just randomly choose one from these that come to mind: noip.com, namecheap.com, godaddy.com.  If this is your first time you may want to read up on registration etc. but all you need is to find a domain that is available, buy it, and configure it as explained later.  Make sure you do not buy hosting with it, as some providers will try to bundle them together.  Well you can do whatever you want, but it's not necessary in this case.

2. Sign Up with AWS

Log on to aws.amazon.com and sign up for an account.  Choose your region, etc and keep going until you get to the main control panel.

3. Hold your horses!

The control panel may be overly complicated.  It isn't, though.  The number of services may be overwhelming, including the names, but we'll get through.  Only two services are required in our case.

Cloud providers typically offer more than just simple hosting.  Keep in mind that big enterprises are running their businesses here too, so this complexity is to be expected.  One of the core offerings of a cloud provider is storage.  Storage keeps everything in place - services need to save their logs, applications exist in storage, databases are persisted to storage...you get the pattern.  Again, due to the enterprisiness of this offering, the storage services have their own terminology.

Your usual "hard-disk" or "USB drive" (or floppy disk) is known as a bucket.  You have a bucket in the cloud in which you put your files.  Amazon offers storage in a service known as S3 - Simple Storage Service.  These bucket also tend to be dirt cheap.  A site a less than 10 pages and low to moderate traffic may cost you no more than €1 a month.

4. Creating the site

Now that you know about the basic concept, it is time to create the storage for your site.  In this example (and pretty much any other tutorial out there), we shall use the example.com domain.  Whenever you see this written down, replace it with the domain name you bought.  Do not prepend it with "www."; that is a subdomain, not the proper domain that you bought.

4.a. Sign in to https://console.aws.amazon.com/s3/;
4.b. Create a bucket named example.com;
4.c. Create another bucket www.example.com (with the www);
4.d. Upload your content to the first (example.com) bucket;

What we'll do is host the site on the example.com bucket and redirect any traffic coming in to www.example.com to it.

5. Prepare the site

Now you'll need to allow the public to access your buckets, otherwise they'll be forbidden from seeing your content (which, presumably, you want to be publicly accessible).  All you need is to attach the following bucket policy to your example.com bucket.  Again, make sure you replace example.com with your domain.

5.a. Set the policy
{
  "Version":"2012-10-17",
  "Statement":[{
"Sid":"AddPerm",
        "Effect":"Allow",
 "Principal": "*",
      "Action":["s3:GetObject"],
      "Resource":["arn:aws:s3:::example.com/*"
      ]
    }
  ]
}

5.b. Set up as static website by clicking on the bucket and select the Static Website Hosting section.  Choose the 'Enable' option;
5.c. Name the index page.  This is the "homepage" of your site.  Typically this is named "index.html" or similar;
5.d. Test the page by entering the Endpoint URL shown to you in your browser, just to make sure it is accessible;
5.e. Select the second bucket (www.example.com) and in the same section choose to redirect requests.  In the input field, enter your domain (without www.);

6. Wire it up

Another service that is required to properly route traffic to our site is Route 53.  As you've seen, you endpoint is appended with a much longer address belonging to amazon.  You wouldn't want to distribute that URL to your clients, after all you bought your own domain.

Route 53 is basically a DNS service - an internet directory for converting example.com to a number that the internet understands.  You do not need to do any of this works, except how to inform the registrar about your shining new website on AWS.  Here's how:

6.a. Open up https://console.aws.amazon.com/route53 and create a hosted zone for your domain (no www.) - Click Get Started Now under DNS Management, or just go to Hosted Zones and then Create Hosted Zone;
6.b. In the details section you'll see a Delegation Set - a list of addresses.  Write these down somewhere, we'll use them later on;
6.c. Click Create Record Set and enter you domain name.  Mark it as Alias and from the Alias target select your bucket.  Do this also for the www.example.com (point it to its own bucket).

7. Finishing

Now that everything is set up on AWS, all you need to do is inform the domain registrar (the site from where you bought your domain).  Remember the 4 addresses in the Delegation Set?  These will now be used to configure the DNS addresses for your domain.  What you need to do is log in to your domain registrar control panel and configure your domain.  Somewhere you should be able to change the DNS settings for it.  Not all providers have four fields - there may be more, there may be less.  Enter all four addresses in the delegation set in the domain configuration.  If there are less than four fields, that's it.  If there are more than four, leave the rest empty.

8.  Live!

Now that you're done, you may need to wait a few minutes until the DNS settings are updated.  This is not related to your site on AWS but on the nature of DNS - i.e. people's ability to enter example.com and be properly taken to your site.  These may take up to 48 hours, but in my case it was only a matter of minutes.

Hope you found this helpful!

29 September, 2015

Intelligent Input Processing

Hello again after quite a long time!  Quite a lot has happened over the past few years, from starting and graduating from University, finding a job in another company and travelling around the world.  I have also been involved in some small side projects, some of which have actually gained some traction.

One such project which I did some basic parts of is a a system for maintaining a list of classified vehicle listings for used (2nd hand) and new cars...or any other kind vehicle.  The interesting part is the way a new listing can be added with minimal effort.  Typically people *hate* filling long forms, and entering the details of a car is no exception.  Even if the form is actively trying to help the user by showing suggestions, it still is not as streamlined as just typing text or actually filling out a hand-written form.

So here I found the thing I hated about forms - having to switch between inputs and having to think about the value I should enter next.  I don't want to think about it, I just want my form to fill up, by itself if possible.  A little experiment lead to the development of a small but quite helpful feature which tries to offload this (minor) effort from the user.

As the data was a simple table, we could predict what the user is going to enter; some details on a car.  There aren't too many attributes when you think about it - a make and model, year, colour, engine and transmission.  You could also do away with some of them, even though it might hurt search rankings.  The result was that a form may be populated by simply parsing the semi-natural text taken from one big text box.  The user no longer had to enter different and specific values in each entry - just one descriptive sentence where order does not matter and mistakes may be easily fixed.  All we needed is some initial data to "teach" the system what to expect.

We now have a very clean solution for entering listing details where a short description relieves us from having to think about each individual attribute of a car (what an epic case of 1st world problemism).

By some luck, this little experiment has made it through to a website and is now available for many users to enjoy.  Let's hope these kinds of little experiments from professionals and enthusiasts keep getting better and more popular so one day we may have a more user-oriented internet, rather than a machine-oriented one.  Oh by the way, the website making use of this little tech is http://www.pickacarmalta.com!

20 December, 2011

Remote Desktop Viewer - The cheap way [Part 1]

Microsoft RDP, RemoteFX, VNC.  That is the real stuff.  Solutions such as those will allow you to secure your connections, log you in to your desktop, compress the connection, etc.  But have you ever thought if it is possible to implement something rudimentary, totally in Java.  Actually it is possible.  But it's nothing much, and what I'll be doing here is a very, very basic implementation of an idea.  Obviously one can go on and enhance it, but it's almost totally impossible to produce a real solution, since Java does not have direct access to the OS, so for example you cannot remotely log-in, as you would for example using ssh.  Well it might be possible, but it would be an overkill.

As I said, I will simply implement an idea, so even though I know we won't be building the next Remote Desktop protocol, it is still interesting.

First we shall lay out some basic requirements.  Basically we will build a server and a client.  The server shall receive a request, it will then grab a screen shot, and send it back.  Meanwhile the client will wait for the server to reply with the image, and will then draw it.  This will go on until we disconnect.

So create three packages first, com.jf.rd, com.jf.rd.client and com.jf.rd.server.  Obviously you can name them whatever you want, but ideally you should have xxx.xxx.client and .server.

We'll start off with the server.  That way we can define what we expect from the client and what we intend to send back.

Now, in the server package create the JRDServer class.


package com.jf.rd.server;


public class JRDServer
{
public static int PORT;

public static String USER;
public static String PASS;

/**
* Parameters:
* Port, User, Password
* @param args
*/
public static void main(String[] args)
{
if (args.length < 3)
{
System.out.println("Usage: JRDServer Port User Password");
System.exit(0);
}

PORT = Integer.parseInt(args[0]);
USER = args[1];
PASS = args[2];

System.out.println("JRD Server sdtarted.  Will listen for connections on " +
"port " + PORT);

JRDServer server = new JRDServer();

server.start();
}

private ConnectionListen listen;

public JRDServer()
{
this.listen = new ConnectionListen(this);
}

public void start()
{
System.out.println("Service Thread starting...");
listen.startServer();
Thread srv = new Thread(listen);
srv.start();
}

public void stop()
{
System.out.println("Service Thread stopping...");
listen.stopServer();
listen.destroy();
}
}


This class is basically an entry point to the server.  I expect some basic Java knowledge so I will describe this only briefly.  We start the server by passing 3 arguments; the port to which we will bind, a username and a password.  The port is the real necessity, and as yet the user and password will not be really used, and will be there so that one day we can implement some sort of security.

There are also the start and stop methods.  start will initialise a listener class which will be running on a separate thread.  That way we can serve our clients in a parallel fashion and also prevent any user from blocking us to the rest of the application in a manner which will stop us from stopping the server.

stop simple stops the listener class and releases its resources.

Next up is the listening class.  This class will loop while the server is running and every time a connection is requested, an other, separate thread is created and the client is served.


package com.jf.rd.server;


import java.io.IOException;
import java.net.ServerSocket;


public class ConnectionListen implements Runnable
{
private boolean running;
private ServerSocket serv;

public ConnectionListen(JRDServer server)
{
try
{
serv = new ServerSocket(JRDServer.PORT);
}
catch (IOException e) 
{
System.err.println("The ServerSocket could not be initialised.");
System.err.println("Reason : " + e);
}
}

public void startServer()
{
running = true;
}

public void stopServer()
{
running = false;
}

@Override
public void run()
{
while (running)
{
try
{
Connection conn = new Connection(serv.accept());
Thread tr = new Thread(conn);
tr.start();
}
catch (IOException e) 
{
System.err.println("A connection could not be accepted.");
System.err.println("Reason : " + e);
}
}
}

public void destroy()
{
try
{
serv.close();
}
catch (IOException e) 
{
System.err.println("The ServerSocket was not closed.");
System.err.println("Reason : " + e);
}
}
}


This time, a server socket is passed as a variable to the constructor. This is the socket which will listen for and accept connections.  The run method, which is the implementation of the Runnable class is what will be running on a separate thread.  Therefore we can simply put a while loop and, kind of, forget about it, since it won't be blocking us (the main thread).  It shall keep on looping until the running flag is false.  So when we start the server we must set running to true and then start it.  To stop it - well - set it to false, and the looping will stop.

Of course, if we won't be listening for any more connections, we should close the server socket.

Finally, the Connection class is created.  Once this is done, the server is basically complete.  Now I should explain what will happen when this is actually run.  Any client that shall connect to this server will receive a byte stream resulting from a screenshot.  It is irrelevant if the client is a web browser, a mobile app or a simple socket.  Also, we won't be checking what the client is actually requesting, so as you can see, the username and password are irrelevant.   That means that you should either practice, and implement an authentication system (easily done) or simply avoid running this server if you fear someone might connect to it and, sort of, spy on you (aye, this is easier).

So, to the connection class.

package com.jf.rd.server;


import java.awt.AlphaComposite;
import java.awt.Dimension;
import java.awt.Graphics2D;
import java.awt.Rectangle;
import java.awt.RenderingHints;
import java.awt.Robot;
import java.awt.Toolkit;
import java.awt.image.BufferedImage;
import java.io.BufferedInputStream;
import java.io.InputStream;
import java.io.PrintStream;
import java.net.Socket;


import javax.imageio.ImageIO;


public class Connection implements Runnable
{
private static final int IMG_WIDTH  = 960;
private static final int IMG_HEIGHT = 600;

private Socket connSock;
private static final int BUF_SIZE = 2048;
static final byte[] EOL =
{ (byte) '\r', (byte) '\n' };
private byte[] buf;


public Connection(Socket connSock)
{
this.connSock = connSock;
buf = new byte[BUF_SIZE];
}


@Override
public void run()
{
try
{
InputStream is = new BufferedInputStream(connSock.getInputStream());
PrintStream ps = new PrintStream(connSock.getOutputStream());


for (int i = 0; i < BUF_SIZE; i++)
buf[i] = 0;


int nread = 0, r = 0;


outerloop: while (nread < BUF_SIZE)
{
r = is.read(buf, nread, BUF_SIZE - nread);
if (r == -1) return;
int i = nread;
nread += r;
for (; i < nread; i++)
{
if (buf[i] == (byte) '\n' || buf[i] == (byte) '\r')
break outerloop;
}
}


System.out.println("Done reading.");


Dimension screenSize = Toolkit.getDefaultToolkit().getScreenSize();
Rectangle screenRectangle = new Rectangle(screenSize);
Robot robot = new Robot();
BufferedImage image = robot.createScreenCapture(screenRectangle);
int type = image.getType() == 0? BufferedImage.TYPE_INT_ARGB : image.getType();
image = resizeImage(image, type);

ImageIO.write(image, "JPG", connSock.getOutputStream());


ps.flush();


connSock.close();
}
catch (Exception e)
{
System.err.println("Error, somewhere...");
e.printStackTrace();
}
}


private static BufferedImage resizeImage(BufferedImage originalImage,
int type)
{
BufferedImage resizedImage = new BufferedImage(IMG_WIDTH, IMG_HEIGHT, type);
Graphics2D g = resizedImage.createGraphics();
g.drawImage(originalImage, 0, 0, IMG_WIDTH, IMG_HEIGHT, null);
g.dispose();
g.setComposite(AlphaComposite.Src);
 
g.setRenderingHint(RenderingHints.KEY_INTERPOLATION,
RenderingHints.VALUE_INTERPOLATION_BILINEAR);
g.setRenderingHint(RenderingHints.KEY_RENDERING,
RenderingHints.VALUE_RENDER_QUALITY);
g.setRenderingHint(RenderingHints.KEY_ANTIALIASING,
RenderingHints.VALUE_ANTIALIAS_ON);
 
return resizedImage;
}


}


There it is then.  The Main screen grabber and sender.  We're not doing much here;  just receiving a request and then write "Done reading" when the process finishes, and then a picture is sent.  The resizeImage method is used to reduce the size of the image so that we do not send an image the size of your screen resolution.  That would be slow and besides, you can also specify what "resolution" you intend to receive.  The socket is also closed here, that's important too.  The lines between printing "done reading" and ImageIO.write are grabbing the screen using the AWT (Advanced Window Toolkit), so what this means is that you must have an OS that supports GUI (i.e. not headless, as it is known) and you must be logged in basically, since it grabs the screen as seen by the current user.  Therefore apart from the fact that we cannot remotely login, we also can't turn off the video card.  You can turn off the screen, obviously (lol).

That was part one of this, erm, tutorial, or whatever it is.  I like doing these sort of mini programs when I am trying to solve other problems, that's why they are not at the bleeding edge of technology.  And then, when I'm done, I just write something about it, maybe someone out there learns something hehe.

The next thing we'll do, is build a client application.  I currently plan on supporting only viewing, but eventually, we might spice it up a bit by adding cursor support so that you may click on the client and it will then be forwarded to the server and eventually consumed by the OS that is hosting the server.

Also, the second part will probably come out either just before 2012, or probably in the first week of January, so until then, Merry Christmas and a Happy New Year! :D